This is a guide to help an inexperienced collector identify trade tools. The word "trade" encompasses a wide range of activities – but for the purposes of this article, trade tools are considered to be implements or devices that augment our dexterity to accomplish a task or to carry out a job.
Most are manual such as these various woodworking tools.
Fig. 1. Clockwise from top left: A variety of moulding planes; a set of bevel-edge chisels; two handsaws; a brass-framed brace.
But there are also optical ones to assist sight and aural ones to help hearing.
Fig. 2. Left, three different thread counters for the cloth manufacturing trade. Right: A monaural stethoscope.
So how do you identify the tool you have found?
First you need to decide whether what you are looking at is in fact a tool. Tools are functional – if the item in question doesn't do anything, it probably isn't a tool.
Then look at it very carefully
If it is big and clunky, it is intended for heavy work. If it is light and delicate is will be for light and delicate work. For example, a blacksmith versus a silversmith.
Fig. 3. Left: A blacksmith's or stonemason's sledge hammer. Right: A jeweller's or watchmaker's hammer.
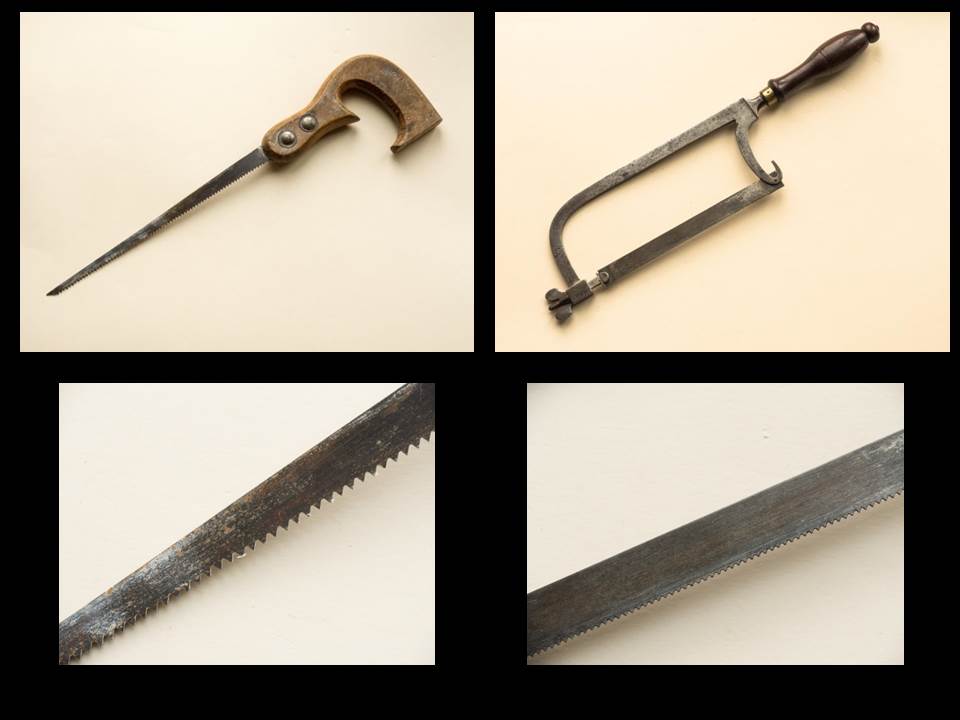
Look at the action of the tool: If it saws, it is for hard material – wood, ivory, sheet metal. The finer the teeth, the harder the material, so a very fine toothed saw is likely to be for metal work.
Fig. 4. Left: A keyhole saw for wood. Right: A Lancashire- pattern hacksaw for metal. Detail of blades shown below.
If it stamps something out – it is likely to be for thin sheet material such as leather, fabric, paper, very thin metal.
Fig.5. Left: Saddlers' pinking irons for cutting decorative edges. Right: Leather workers' punches.
Look at what it does. Does it cut something? Does it hold something? Does it bend something?
Fig. 6. Clockwise from top left: Woodworkers' gouge; jeweller or silversmiths' hand vice; round-nosed pliers for wire working.
Check the material from which the tool is made. A pair of scissors made of silver is more likely to be for cutting grapes rather than fabric; a highly carved chisel and mallet will probably be ceremonial, such as this keel laying set.
Fig. 7. Left: Grape scissors. Right: Ceremonial keel laying mallet and chisel. In the days of wooden sailing ships, the laying of a keel for a new ship was an important occasion.
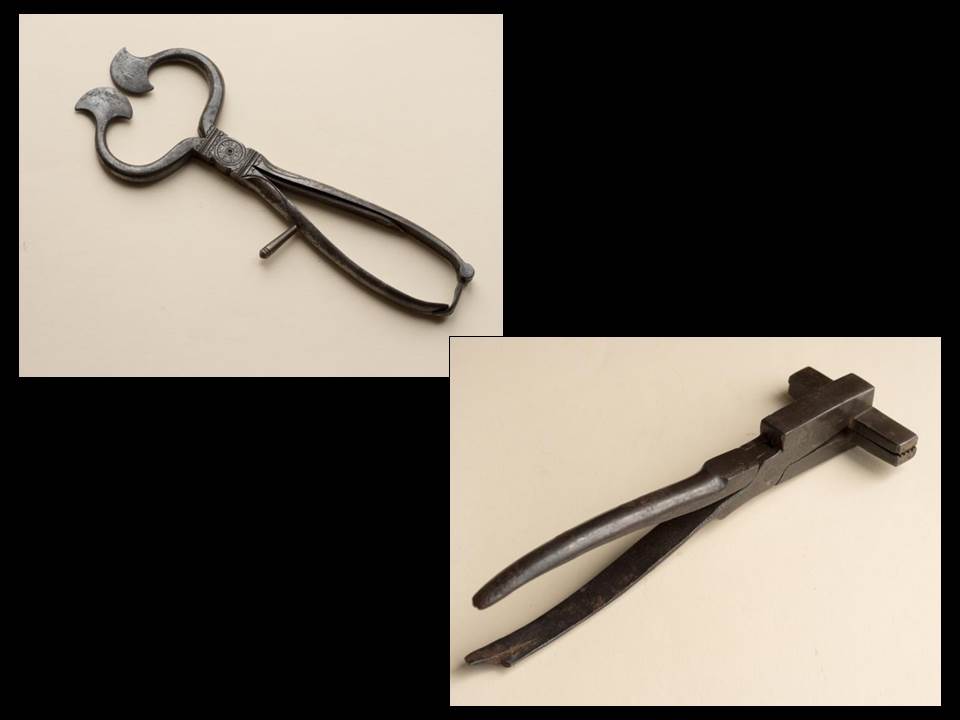
Look at any decoration on the tool. A superficially decorated tool is more likely to be for personal or domestic use. Undecorated tools are likely to be trade tools. (This only applies to British and American tools – European tools are often more decorative.)
Fig. 8. Left: Sugar nips for cutting up sugar cones. Right: Upholsterer's pliers.
Who carried out the various trades? Some trades were carried out almost exclusively by men, some only by women. If a tool is big or heavy it was probably used by a man – if it is light and delicate by a woman. Prior to the 20th century, there were much clearer definitions of what was considered man's or woman's work.
Fig. 9. Left: Heavy duty patent wrenches. Right: Straw hat makers' splitters.
Materials can be helpful, though also sometimes tricky. Materials that today we think of as prestigious, in pre-plastic days, often had qualities that made them suitable for everyday uses, such as ivory for handles as it turned well.
Fig.10. A selection of ivory-handled tools. From left: Two draughtsmen's erasing knives; a drawing pen, two opsometers (map measures); a gun turnscrew.
Some materials can date a tool for you. Stainless steel was not invented until the 20th century. Plastic was not in use before the 20th century – with the exception of vulcanite which dates from the mid-19th century and celluloid and Gutta Percha which date from the latter part of the 19th century. Any tool marked CAST STEEL is post-1800 – although the material was invented in the 1740s and slowly was used more and more, it didn't really come into its own until the turn of the century and we don't know of any tools before 1800 marked CAST STEEL.
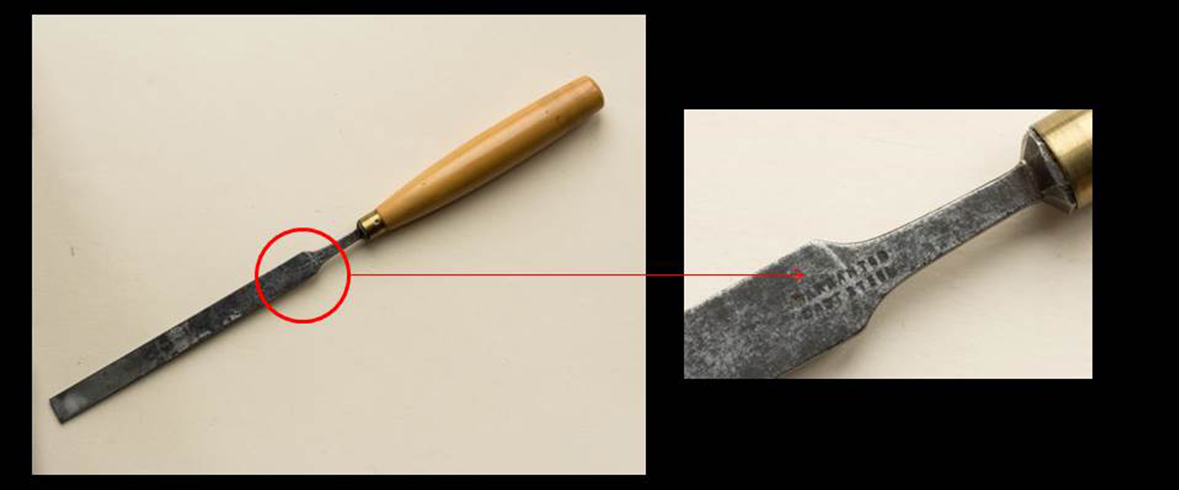
Fig. 11. A woodworking chisel marked "Warranted Cast Steel."
Other marking can also be very useful. The 1890 McKinley tariff required that all goods imported into the USA had to be marked with their country of origin and it became common for goods to be marked "Made in England" regardless of whether they were intended for export or not.
Registered designs were only introduced in 1842. Designs registered until 1883 will carry the diamond mark. From 1884 non-textile designs were issued in a single numbered series, starting from 1 and carrying on to the present day. Objects will typically have 'RD' or 'Reg Des' on them followed by a number. Obviously looking up a registered design will identify a tool.
The same is true of patents. They were not commonly marked on goods until the 19th century. but if a tool carries a patent number, identification is easy. Generally, British patents do not carry a date; American ones do – which is helpful for research and identifying the source of a tool. But this is not an infallible rule! Occasionally British tools will carry a patent number with a date!
Fig. 12. Top: A caliper rule marked "Made in England." Centre left: The Registered Design diamond mark; Centre right: A Registered Design spoke shave, marked RD. Bottom: A patented wrench by W. & C. Wynn.
Dates don't tell you what a tool was used for but they do help with where to look for information.
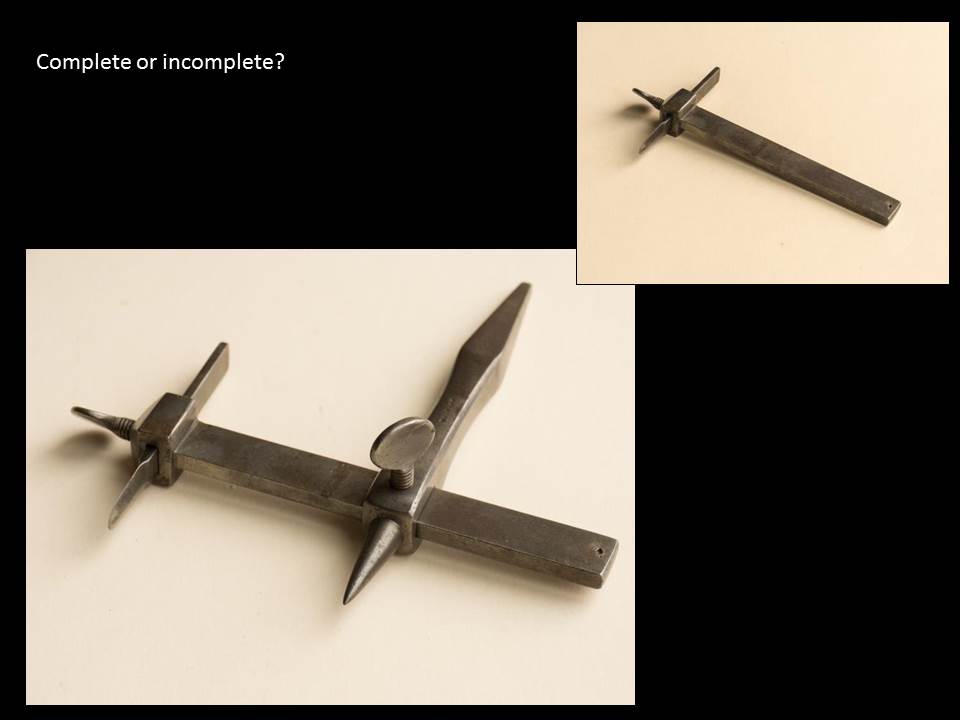
Complete or incomplete? Many tools end up incomplete. Don't assume that what you are seeing is the whole tool, it may only be part. A plane iron on its own might look like any other cutting implement – in the plane, its purpose is obvious.
Fig. 13. A leather washer cutter, shown complete on the left but just the cutter shown on the right.
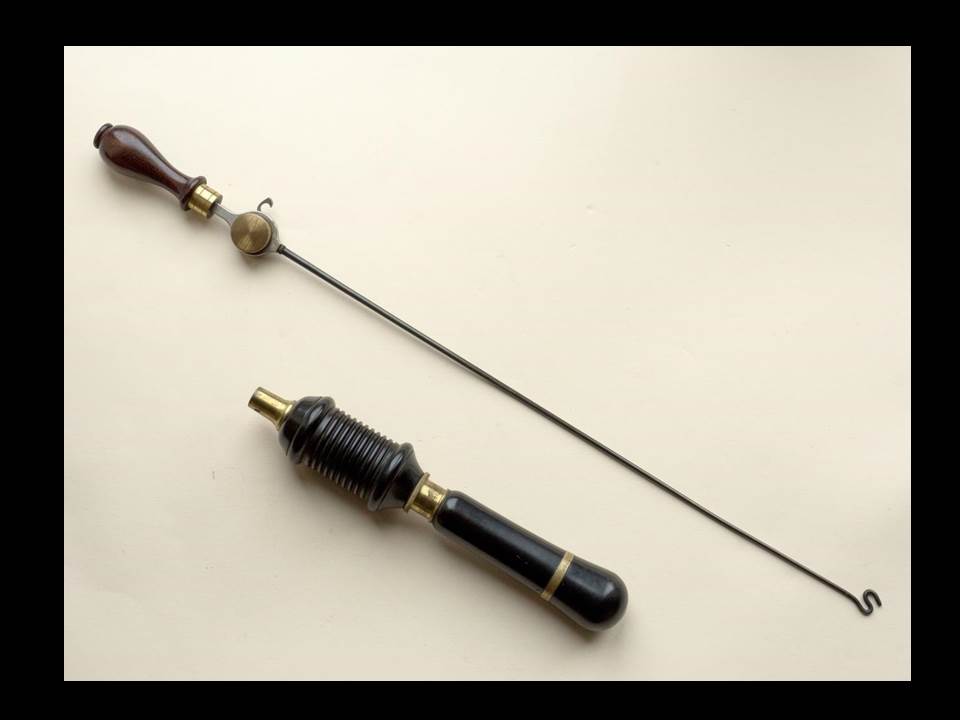
Also, lots of tools had to be used in conjunction with other tools, so on their own become a mystery.
Fig. 14. A piano makers' bow drill. The bow without the drill would be difficult to identify.
Wear marks: If a tool shows signs of wear marks, either from the material being worked or from the hands using the tool, this is another aid in showing how a tool was used and therefore another clue to what it is.
Fig. 15. A file cutter's hammer.
History of the tool: If a tool comes with a story, this will often tell you what the tool is.
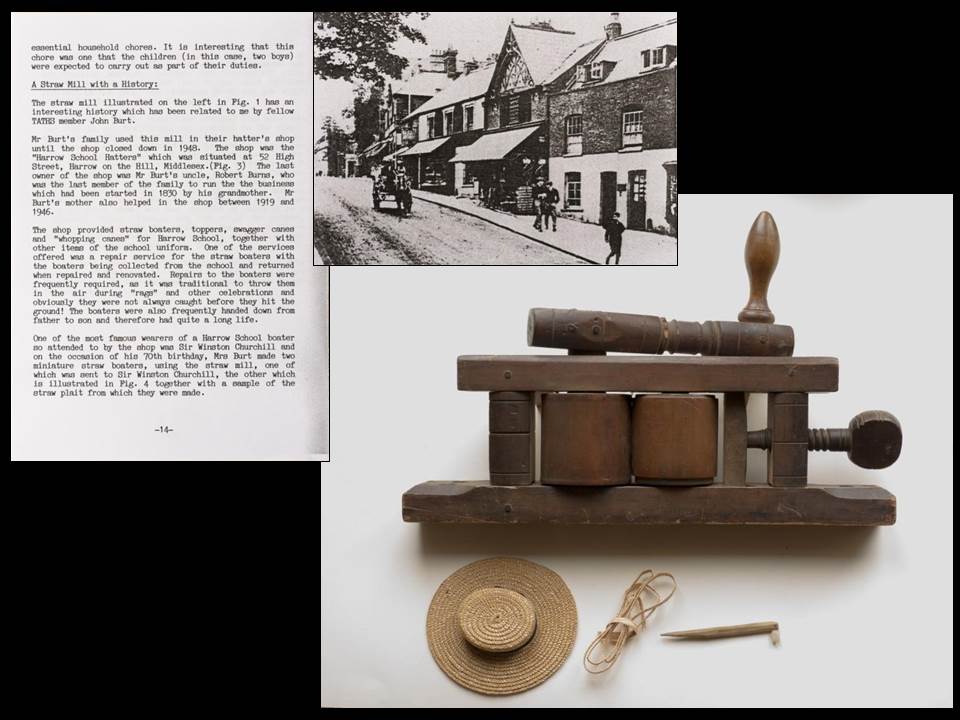
Fig. 16. A straw mill and straw splitter from The Harrow School Hatters, in Harrow-on-the-Hill, Middlesex.
Location where it came from: Some areas of Britain had very specific local trades and if you know that this is where the tool came from, it can be helpful in deciding what the tool is.
For example, the straw hat trade in England was almost exclusively carried out in Bedfordshire. If you are told that a tool came from someone's great grandmother who lived in Luton, check out the straw plaiting tools. The Somerset Levels are a centre for willow basket making. Northampton was the centre of shoe making. Bath had, and has, a considerable stone working industry. These are not hard and fast rules but are a good place to start looking.
Fig. 17. Clockwise from top left: A straw plait mill; two willow splitters for basket making; two show hammers and a stonemasons' fillet saw from Bath.
Check any residue in or on the tool. For instance, if there is sawdust in the cracks, it is probably a woodworking tool.
Sources of information: One of the features of tools – and this is true of many tools – is that the form hasn't really altered in hundreds of years. Take wooden planes for example; they have barely changed shape from when the first commercial makers set up in business in the 1680s until they ceased to be produced in the 1960s.
So look at pictures; or even other tools; books – even simple little books such as the Shire books can be very helpful; trade catalogues – they are a wonderful source of information; specialist societies' websites and many other online resources.
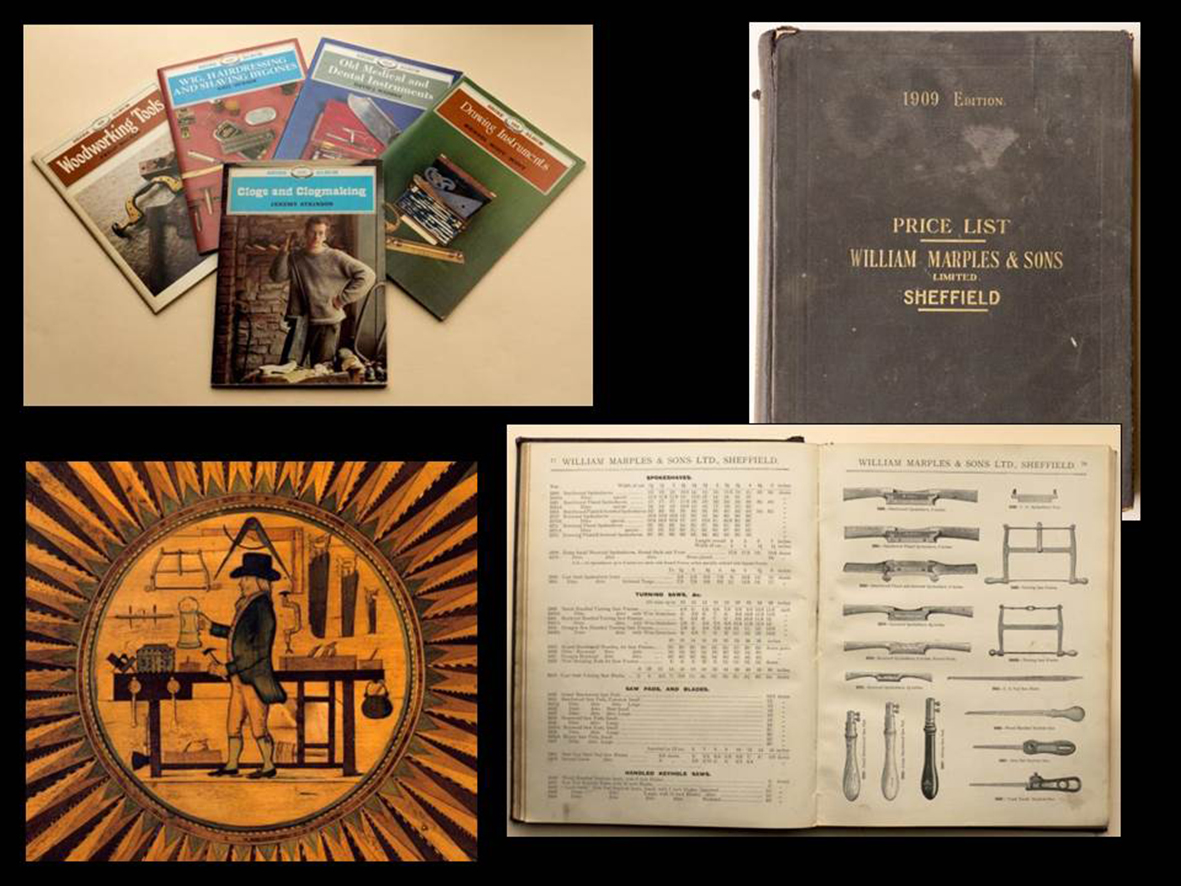
Fig. 18. Clockwise from top left: Some of the Shire books, a 1909 William Marples & Sons, Sheffield catalogue; a page from this catalogue; the centre vignette from the veneered inside of the lid of a ca. 1790 cabinet maker's tool chest showing the craftsman at his workbench.
And remember, so much of what we can learn is told to us by the tool itself. Look at it carefully and listen to what it can tell you. It will help you!
This article by Jane Rees was specially written for the Tools & Trades History Society, July 2013.


